Winter is always the season of work. There is no “off-season” when you’re dealing with racing and cars.
If you read our previous posts, you know we solved the transmission temperature problems, but still had an issue with crank sensor sync loss, causing backfires and loss of power.
After some reading and talking to people and the situation was not going to be solved with the hardware on the car. It just seems that if you’re at a certain power level and still using the stock three tooth crank wheel arrangement, you end up with sync loss issues. I don’t think anybody has fully diagnosed what is happening. It only happens to me when I’m in situ, racing the car on a real surface. The problem doesn’t happen putting around town. It doesn’t happen revving the car in the driveway. Likely, it would take some expensive dyno time to try and catch the issue happening with a sufficient amount of data logging to really nail down what was happening.
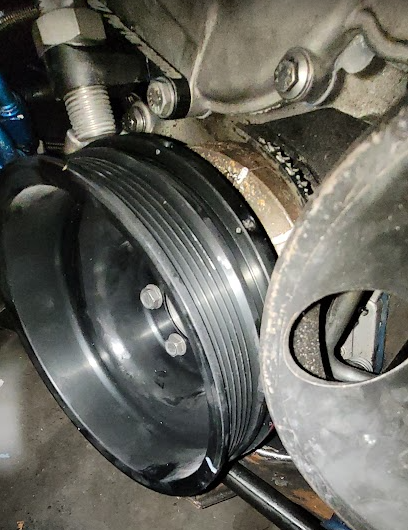
But there was good news. Everybody that had fixed the problem had done it by moving from the stock three tooth wheel to a wheel with more teeth. Some folks had used an 18-1 wheel pressed onto the front of the crank. But what piqued my interest was the Cruz 12-1 crank pulley. It’s a replacement pulley with 11 magnets embedded around it with a missing tooth configuration, and a relocated hall effect sensor to read the magnets.
This setup has a lot of pluses. There’s no machine work. I don’t have to take parts apart, just take parts off. It simply replaces the crank pulley. It also shaves three pounds off the crank, which is worth more than nothing.
The minuses? Not much. The documentation is thin. If you set it up like it says in the instructions that come with the kit and try to use it with the ECUGN computer I have, it won’t start. The secret is knowing the ECUGN (and the stock computer) sync on cylinder #6, not #1. the instructions that come with the kit are for setting it up for a system that syncs on cylinder #1. There’s also apparently some variation in manufacture of the pulleys that also affects setup. That might be a big negative if you’re expecting a bolt and go, but at this point I’m resigned to the fact that I’m beyond bolt and go on this car. Everything from here on out is going to be a learning experience.
Now, since I needed to remove the belt to remove the pulley, and the water pump had a small leak, I went ahead and pulled the water pump so I could replace the gasket. The cause of the leak was apparent: Something had hit the side of the water pump and caused a distortion in the casting that lifted one of the edges, causing a weak seal and a small leak.
Fixed. I sanded the distortion flat and reinstalled.
Moving on to the crank trigger kit itself, it’s important to read the instructions. I installed the lock nut on the top, missing the part in the instructions that said to put it on the the bottom. The result was the lock nut interfered with the water pump pulley. Oops
Once the lock nut was flipped, I installed the pulley NOT according to the Cruz instructions. Since we’re setting this up for the ECUGN and not a Holley, the setup is to put the engine at Top Dead Center #1 on the compression stroke, then install the pulley with the missing tooth as close to the sensor as possible. It really should be right on the sensor.
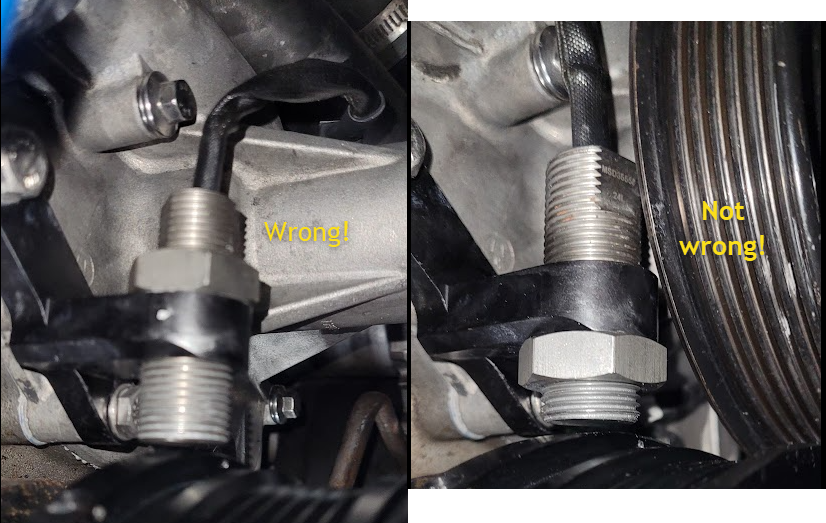
I did put anti-seize on the threads of the sensor. It’s stainless steel and the bracket is aluminum. We don’t want this to gall.
Then you grab your laptop with TunerStudio on it. The aim is to get the camshaft sensor to trigger in the gap between the 10th and 11th tooth on the crankshaft trigger wheel. You can use the composit logger in TunerStudio to see this. Pull the fuel pump fuse so it doesn’t try to start and crank it until you get a graph. Check the cam pulse timing, adjust, and repeat until it looks like this.
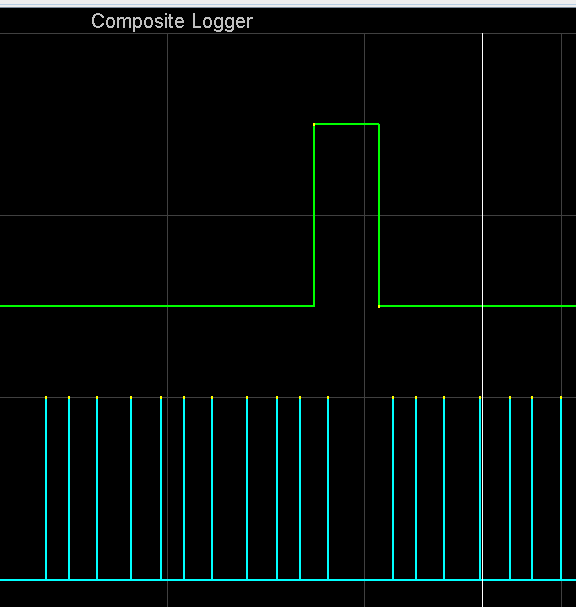
Once you’re here, you can lock down the camshaft sensor and try to start the car. At this point, I left the water pump pulley off so I could see the timing indicator on the crank pulley better. Just don’t run the car for very long like this.
It should start right up. Once it does, get back in the decoder wheel dialog and set the timing to fixed advance at about 25 degrees. You’ll hear the idle change a tad when it switches to fixed advance. Then, set your adjustable timing light to 25 degrees advance and light up the timing indicator. It should be dead on zero. If it’s not, you can adjust the crank trigger angle from 90 degrees until it is dead on.
Then shut it down, put the water pump pulley and belt back on, and you’re done. I did have to refill the coolant since I changed the water pump gasket. You will need to top it off. The crank sensor bracket uses two of the water pump bolts, so you’ll lose some coolant when you install that piece.
Then remember to switch your timing back from fixed angle to use the timing table.
Observations?
Well, it starts quicker, which was anticipated. The other thing I noticed was when checking the timing, the timing is now dead on. Using the stock setup, the timing mark would wander around, even with the timing set at a fixed angle. Just a couple degrees, but it wasn’t completely stable. Now it is locked in place.
This means the idle is smooth. Much better than it was. and free revs seem cleaner, but that could just be me wanting it to be smoother.
Did it fix my sync loss issues? I don’t know yet. The conditions where I was having that problem are not possible to reproduce on a public road without breaking the law in a very big way. So we’ll have to wait until we can hit an autocross in the spring. We’ll update then.
Next up for winter fun is making another attempt to seal the valve covers. If we can be successful with that, then hopefully we’ll be able to tell if the oil pan gasket it leaking or not. It’s hard to tell.
Thanks for reading!